Friday 28 November 2014

Let's create: December Days album 9-16

Hello Sassy friends
 Thank you for joining me again as I continue sharing 
my December Days album foundation pages with you! 
To our readers celebrating Thanksgiving, wishing you and your loved ones well.

Welcome to part 2: Day 9 to 16
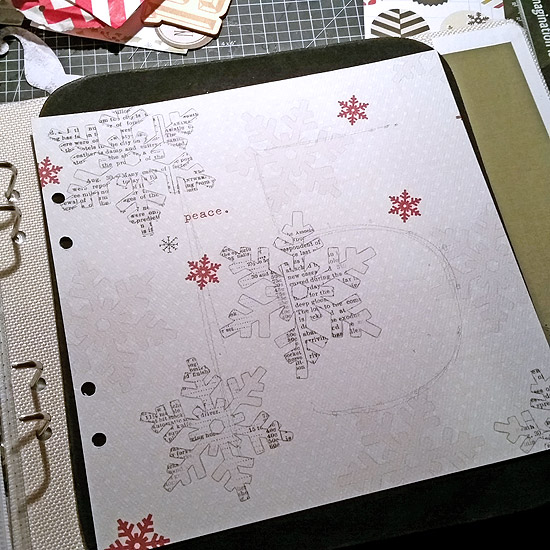
 Day 9
Patterned paper, number, ephemera, flair, glitter stickers

 This spread is very wintery as I already have photos in mind that I want to use. I have kept the colour palette simple, which really ties it together.
 Have a go at cutting your own snowflake and popping it into your album 
To make a bit more room, I have created a little pocket by cutting a slit 
into one of the album pockets with a craft knife. I can pop bits 
and pieces in there down the track.
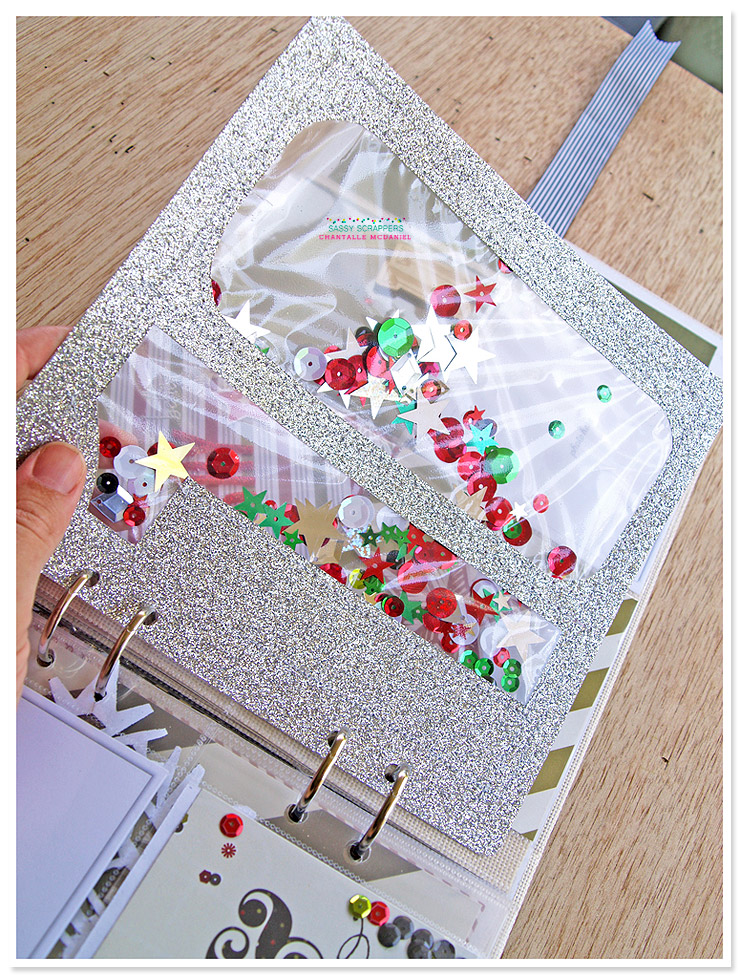
Day10
Patterned paper, glitter cardstock, sequins

To me, Christmas time means all things sparkly and I so love a good shaker pocket!
Here's how to make your own page divider shaker:

1. Trim your sheet of glitter cardstock down to 8x8 inches. 
**Remember to reserve the strips for use further in the month!**

2. Next, using a lead pencil, trace the number you want to use on the reverse side, in reverse. You can do this by eye or maybe print off 
some large numbers to use as a stencil.

3. Using a craft knife, cut out the numbers.
4. Next, I have used a basic A4 plastic sleeve that I'm sure you have lying around at home somewhere, and filled it with some sequins. 

5. Laying the sleeve underneith the cut number divider, sort of squish them around until you are happy with the distribution inside the sleeve.

5. Now, using a sewing machine, stitch around the outline of the numbers. You can go over quite a few times as the stitching doesn't show up too much. I'll admit mine could've been a bit neater, but I'll just go with it ;)

6. Once you finished sewing, trim off excess thread and trim off the excess plastic sleeve around the edges


I love how it catches the light. So festive!
Day11
Patterned paper, number, ephemera,alphas
 Fold over a 3x4 Sn@p card to create a bit of interest with a lift-the-flap

Day12
Patterned paper, number, ephemera, doily

This has turned out to be one my favourite spreads so far!
 I created this cluster by cutting a large circle out of patterened paper 
and popping a circular die cut on top. The leaf die is a Couture Creations one 
I have at home, but you could use some ribbon, tinsel or hand cut some 
shapes like feathers and stitch them down.
Day13
Patterned paper, number, ephemera, mini word stickers

Very simple page. Have some fun by adding lots of little words that have significance to your festive period on one of the 4x4 pieces of paper. Punch one of the cards in the ephemera pack and add it on its own on top of the album sleeve.
Day14
Patterned paper, number, ephemera

Another one that I love. The acrylic page dividers are just so awesome!

I have created another stitched banner using the banner technique from my
Part 1 post, with the large triangles from the ephemera pack. Create a cluster with different elements from the pack.
Day15
Patterned paper, paper clip, ribbon, Sn@p card, Merry & Bright stickers, glitter cardstock

Hand stitch your number for wow factor!
 How to create this fun stitched page divider:

1. Use one of your page dividers that we have already prepared last week 
(A 12x12 trimmed to 8x8)

2. Using a lead pencil, draw the number you wish to use on top.

3. Using a paper piercer, or a large needle or pin, pierce the papers at regular intervals along the pencil lines. (see arrows below) Once you have pierced all the holes, erase the lines with an eraser.

4. Now, thread a thin ribbon (you could also use twine) and backstitch all along the numbers, using your holes as guides.


The final product is very striking! Embellish very simply to really make it stand out.

Day16
Number, glitter stickers, alphas, journalling spots

A banner style heading and a photobooth place holder for later. 
TIP: Attach your journalling and other bits to your binder
You can see I have given my number a bit of a dazzling!

Here's how:

1. Go over your wood veneer number with some silver paint, a paint marker (what I have used) or some mist


2. Once dry, go over the debossed area with some silver 
Stickles or similar glitter glue


Ta da! Looks fantastic doesn't it!

Thanks again for stopping by. I hope I have given you some ideas to get you excited about starting your album!

Join me again next week, when we look at days 17 till 25.
 Till then!

Chantalle

Thursday 27 November 2014

Cards - Gossamer Blue

  hi everyone ,
Anita here sharing some cute cards you can make 
using some left over scraps of patterned paper

using Gossamer blue Gramercy road

  i know most of us throw out scraps that we have left over from die cutting
  but i wanted to use this scrap of paper from last weeks layout that i had die cut with a doily die and some how use it .
Ive used it in he center i think it draws the eye into the center of the card


and here is another card i created using a few strips of paper that where small and would have ended up in a scrap pile (really it should be called the last and found ) cause how many times do you go looking through that box of scraps and find paper you love i know i do


so i hope you get inspired to make cards with your left over scraps 
  don't forget to check out the sassy store for
 Gossamer Blue collections
 
 
happy crafting
 
 
Photobucket

Wednesday 26 November 2014

Gossamer Blue - On My Desk

Hello, Leonie here this morning sharing one last project with the 
Gossamer Blue - On My Desk then it's on to something Chrismas!

Here's my page for today. 


I used several of the diamond die-cuts and wood veneer to help determine 
the title and sentiment on my page.  
I also added some gold spray ink to the flowers and gold gel pen boarders around the patterned paper.


I really like the layered effect here with the 3x4 acetate cards.


Thanks for stopping by the Sassy Scrapper blog.  Please follow the links below for 
all the Gossamer Blue products featured today.
Happy creating.
Cheers
Leonie Neal-Dawson.


On My Desk Screensaver 12x12 Paper On My Desk Multitasker 12x12 Paper


On My Desk You're a Gem  12x12 Paper On My Desk Wood Veneers


On My Desk Gold 3x4 Transparencies On My Desk Die Cuts Ephemera On My Desk Puffy Stickers

Photobucket

Monday 24 November 2014

Project Life | Week 44...

 Hello Friends!  Welcome to Project Life Monday.  Today I am sharing Week 44 | October 27 - November 2.
 As we approach the end of the year and the busier we get, I am more and more determined to get my PL 2014 documented! Even if it is in the most simplest of forms and using leftover bits and pieces from many different collections!  Can you tell I am getting eager to document November just so I can play with the new Sassy December Project Life kit???  Check it out!
 
 
However, getting back to Week 44, I have continued to play with more Heidi Swapp September Skies and added touches of Crate Paper Notes & Things.  Two of my favourite collections!
 

This week I have included the basics (journaling and photos) and applied my go-to colour theory to complement the entire spread.  I started with photo placement and then chose my initial patterned paper - the top floral paper, Alpine Rose from the Heidi Swapp collection. From there I let the pink hues direct me.


With this paper, I also love that there is a hint of navy in what is essentially a feminine pattern and therefore I have no qualms about using it with my boys featuring on this page.  *grin*  Besides, there's a fair chunk of navy/black & blue in their clothing to help create visual movement across the page.


There was also a phenomenally hot day during this week and the kids all felt it while at school.  Welcome to the first real heat wave of the season!!  LOL!  They were quite pink/red in the face by the time they got home from school.  The pink hues subliminally relay the reminder along with the words.


The easiest way to document this event was with screen shots of my iPhone weather app.  However, I didn't want to fill three pockets with three different screen shots but I still wanted to show the rapid jump in temperature in a span of 3 hours.  I opened each image in Photoshop and shrunk each to fit onto a 4x6" layer.

I then used this opportunity in Photoshop to add some text below.  The electric fan die cut, from the Heidi Swapp ephemera pack, was the. most. perfect. embellishment!


Fortunately, time indoors due to weather, also promotes artistic endeavours.  I adore my children's artwork and really wish I could keep every single piece.  I gave my youngest a 3x4" sheet of cardstock, some pens and let him draw whatever he wanted.  I love that the colours in his artwork ties in perfectly with this week's PL.


...............................................................


On Page two I chose softer colours, white space and four essential photos to tell the story of this week.


My crusade to get my Project Life documented had me sifting through my Becky Higgins Project Life journaling cards.  Above I have typed on the lower half of a card and trimmed it to fit the photo.  Below, I have used a card as a background to help highlight the Heidi Swapp September Skies transparency.


To add the white space between the photo stories, I created my own filler card with some of my leftover Teresa Collins Nine & Co.  A simple label sticker from Studio Calico, grounds the word strip, chipboard heart and fussy cut bird image.


I have finished off my spread with another Becky Higgins journaling card which was fed directly through my typewriter.  It has been teamed with the Echo Park "Currently" Element stickers to fill out my journaling for the week.


Using leftovers can be the quickest and easiest method when creating PL spreads.  However, for a cohesive look, try to keep the colour story consistent throughout the pages, especially if you're going to combine several different collections.  Thanks for visiting..x
 
September Skies Beautiful Bouquet Paper 12x12
September Skies Dusk Paper 12x12
 
September Skies 6x6 inch Paper Pad
September Skies Word Strips
 
September Skies Ephemera Pieces
Photo Freedom V2 Element Stickers
 
Jillibean Soup Newberg Navy Alphas
 
Studio Calico Label Stickers
 
Necessities Adhesive Teal Enamel Shapes 30/Pkg
 
Photobucket
09 10