Hello and welcome to our 25 December Days mini album tutorial!
I've been keen to try a method of documenting December for a while now, but fail every year (mostly because I complain that my holiday snaps are too terrible - particularly those early morning, Christmas day ones!!) This year I am making an effort to capture my favourite time of the year - barbeques, swimming, sundowners, picnics, carols, beach days, snoozing in the hammock....
I can't wait! We are predominantly using Basic Grey's 25th & Pine collection which I found
nice and fresh for our warm Festive Season.
This post contains
Cover to Day 6 instructions, but you can
zoom ahead here if you wish.
Okay, so let's start with our COVER
Our Basic Grey 25th and Pine journal comes with lots of little elements inside to make our daily recording easier, but we are going to add some bits and pieces to pretty it up even more!
Start by taking the sheet of 'Yuletide Blvd' and trim a section that is 110 mm (w) x 80mm (h). Attach this to your cover, near the top as shown
Then, trim a section of the same paper, (using the scroll pattern facing up) to size 55mm (w) x 140mm (h) over the top (1 in the pic below)
2. Adhere the transparent christmas tree in the pack of 25th & Pine die cuts
3. Using foam tape, adhere the speech bubble over the tree
4. Trim a piece of the Maggie Holmes paper to 184mm (w) x 25mm (h). We are going to create a banner, by folding this strip at intervals 35mm; 52mm; 132mm and 149mm. Fold the last two on the outside edges, inside towards the centre to make the banner shape and trim a 'v' shape at the ends.
5. Add the die cut title supplied in your kit. It's quite a fine cut, so please be careful when working with it. It comes in two pieces (as the typeface had a break in the script) Just attach the 'er' separately but close to, the 'decemb'
6. Using the glitter Thickers supplied, create the word 'days'
7. I have added a few sequins to the front as a final embellishment
You will also notice, there is a charm attached with a book ring, to the cover
To create this:
1. Take the 'Be Merry' tag from the 25th & Pine die cuts pack
as well as the large transparent yellow star.
2. Add the year 2013 (or a word of your choice) using Thickers, to the tag.
3. Punch a small hole in one of the points of the yellow star.
4. Thread the tag and the star onto the book ring.
5. Tie some seam binding onto the book ring
INSIDE COVER
For the inside cover, start by trimming some of the vellum supplied to 95mm (w) x 155mm (h)
Using a hole punch, punch a row of holes close to the bottom edge. You are now going to snip a gap between the bottom bit of the punched hole and the bottom of the paper (as shown by the arrows below). Do this along the whole row. This will give the illusion of ripped notepaper. If you have a notebook punch, then by all means, use that. This is a cheat's way that I use often.
Next, take the calendar transparency from the 25Th & Pine die cuts pack and adhere it over the top of the vellum. I have placed a star sequin under the number 25 using a glue dot and a tweezer.
Finish it off with the 'deck the halls' and a 'holly' transparency, some sequins, a 'tis the season Elle's Studio snippet and the yellow epoxy button
DAY 1
I've just popped a number '1' from the 25th & Pine number die cuts
and wrapped a bit of the gold twine around it
DAY 2
Again, just attached the number '2'.
* I've given the darker green areas of all of the green numbers, a coat of glossy accents
for a bit of shine. This is optional.
DAY 3
Let's open door number 3 with this advent calendar type door!
To create this advent door:
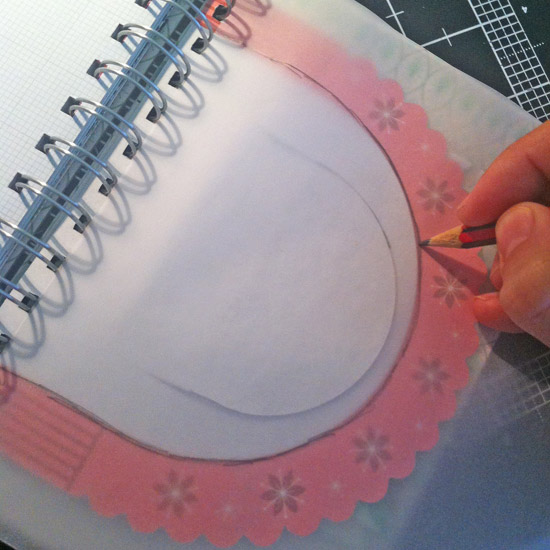
Start by cutting a shape on the circular page. This can be any shape really, as long as it's inside the white area. I've chosen a semi circle shape with an extended area that I am going to use as my 'door'.
I just cut this with a craft knife.
Next, turn the flap over, and using some vellum or tracing paper, trace the shape of the white area.
Cut this piece of vellum out and place over a piece of the Maggie Holmes paper.
I have chosen this bright yellow to inject a bit of that Aussie summer Christmas feeling into this kit!
Next, take that yellow shape you have traced and cut out, and adhere it inside the pink area. The navy side will then be visible when you open the door.
Going back to our cut door. Adhere the bells from the 25th & Pine die cut shapes with some foam tape. (Make sure you don't put tape on the right edge as we don't want to stick the door shut)
Now adhere the little candy transparency over the edge of the door. Only place adhesive on the right side, as this will form a little latch to keep our door shut.
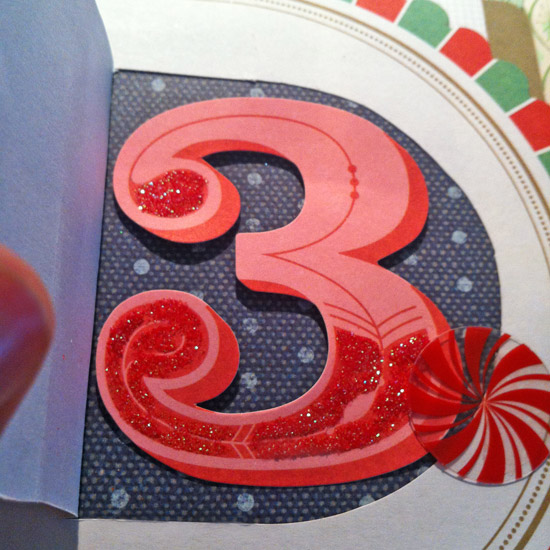
Inside, I have placed a large '3' from the 25th & Pine numbers onto some foam tape.
(I have popped some glitter over the darker areas - this is optional.)
You could also put some glitter over the berries on the bells as well.
DAY 4
Simply embellished with the navy tree epoxy sticker, a snowflake transparency and the number '4'
DAY 5
This page has a fun pocket and I have created a removable tag to go inside.
To make the tag, cut a section of the 'Sleigh Bell Trail' to 82mm (w) x 159mm (h).
Trim the top corners and if you like, round the bottom edges.
Cut out the tree tag from the sheet of 'Santa Highway'. Punch holes in both tags and thread with some of the pink twine.
You will notice I have cut a circular peekaboo in the pocket. This is optional.
Lastly, embellish with the 'Home for the Holidays' 25th & Pine cutout. (I have snipped off the house)
DAY 6
On this page, we are going to create a fun star shaker pocket!
Your kit comes with a pre-cut vellum shape.
If you have a sewing machine, sew the edges together, leaving a space open at the top.
Insert a mix of your favourite sequins and sew shut.
If you don't have a sewing machine, follow the same procedure, using double sided tape instead.
Add the 'Merry Christmas' Elle's Studio snippet as a final flourish.
next page is as such: Using the 'Santa's Workshop' 25th & Pine die cut from the pack.
* On all of the blank journalling pages, I have added some of the little icicles
which are attached with a staple.
I hope you have enjoyed the process so far!
I will be back again next week to share the next few chapters.
I will also be on the Sassy Scrappers Facebook page
with updates on how my album is progressing.
Till next time!
Chantalle


.jpg)
.jpg)


